Disney Princess Favor Bags
Looking for unique Disney Princess Favor Bags? Our creative DIY Disney Princess party favors are sure to delight your guests. These party supplies are fun, easy to make and cost pennies to make.
Children love to dress up and pretend and one of the most popular dress up parties is the Disney Princess party. It's all about princess costumes, wands, crowns, jewelry & sparkles. Whether you're celebrating with one princess theme or all the princesses, these Disney princess favor bags are sure to add magic and fun to your party. These homemade party supplies can also serve as decorations or centerpieces.
Here they are on their "Photo Shoot"
What's great about these Disney princess favor bags is that they work for any princess or doll. We thought you might want a closer look so here they are in all their splendor.
Cinderella Favor Bags
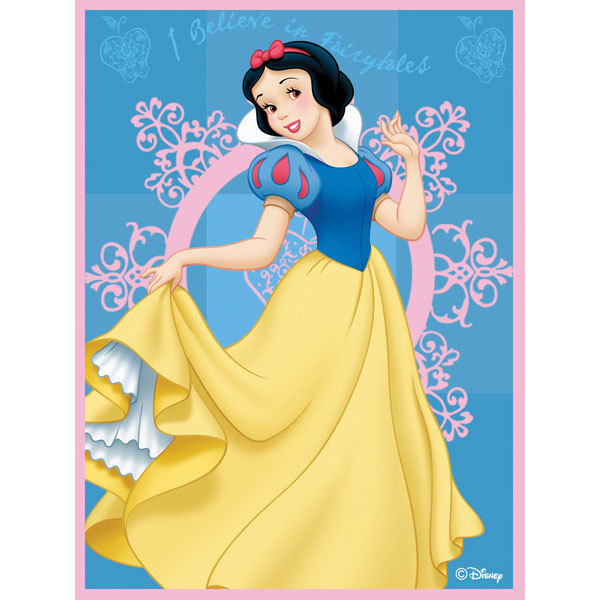
Snow White Favor Bags
TinkerBell Favor Bags
Minnie Mouse Favor Bags
Little Mermaid Favor Bags
Sofia the First Favor Bags
Mulan Favor Bags
Princess and the Frog Favor Bags
Merida Party Favors
Sleeping Beauty Favor Bags
Pocahontas Party Favors
Princess Jasmine Party Favors
We will post the rest of the princesses soon and below is information on the supplies needed to make the Disney Princess Favor Bags.
Materials needed:
- Princess Cutouts
- Satin Pouches - We bought ours here. We used the 5" x 7" (12.7 cm x 17.8cm) size, however note that if you are going to close the pouch completely, the fillable size is 5" x 6.75" (12.7cm x 17.1cm). You can use any size bag as long as you adjust the princess cutout size to proportion.
- Cellophane Treat Bags (optional)
- Double Sided Tape and/or Glue Dots
- Treats
Step 1
Download, print and cut out Disney princesses for your party. Crop the photo to just below the arms or in the case of Jasmine or Tiana below the corset or below the flowers, in order to save on printer ink. Print on card stock or photo paper for a sturdier cutout. Once you have cut them out, trim the bottom and leave enough on the bottom so you have where to glue or tape the princess cutout (see our princess cutout on image above). Here are some of the ones we used. Please note that while these images are free for personal use, the original artwork is property of Disney.
Disney Princess Gallery
Step 2
Fill treat bags - We used the shaped clear cellophane treat bags but you can use your favorite bag or put the treats directly into the satin pouches. We like using the shaped treat bags because they help to contain the treats and gives a smoother appearance to the "gown" but this is optional. If your treats include long items like wands or specialty lollipops (the ones with the long stick) try to put them in the same place in the treat bag so that they all look the same.
Step 3
If you used a cellophane bag, tie the top with a twisty tie. If you have long treat items, tie it loosely around the treats. It does not have to be super tight. Tap the cellophane bag slightly on a flat surface to flatten the bottom a little bit so that it can stand on it's own (if possible). Now place goodie bag in satin pouch.
Try to get the pouch (with treats inside) to stand. Like picture below.
Step 4
In this next step you have options. Look at the picture above and notice the 3 possibilities for tying the favor bag.
- Position 1- You can leave the bag as is and pull on both drawstrings of the satin pouch away from the bag in an even manner but only half way.
- Position 2 - You are folding the top of the bag in at that level. Then pull both drawstrings evenly but not all the way.
- Position 3 - Fold below the lower seam line, then pull both drawstrings of the favor bag evenly but do not close the bag completely. Leave a space big enough to insert your princess cutout.
Each different position will give your Disney princess favor bags a slightly different look. We used position 3 for this Cinderella party favor tutorial but if you notice the Snow White favor bag for example, her "gown skirt" was folded position 2.
After you fold the top, your favor bag should look similar to the one below at this point of the tutorial.
Step 5
- Pull out (and away from the bag) on both drawstrings so that both drawstrings are about even. Pull drawstrings halfway, making sure to leave space to insert the princess cutout (see picture below).
- Secure the princess cutout by placing a piece of double sided tape (that's what we used) or glue dots about 1/4 inch (.64 cm) below the princess's waist on both the front and back. We suggest you place the princess with her waist slightly higher than the bag, otherwise she will look like she's "sinking" into the dress. What's great about the double-sided tape (sticky on both sides) and the glue dots is that they are very forgiving and you can reposition them if necessary without having to add more tape or dots.
Press the front of the cutout against the inside of the satin pouch. Press the back of the cutout against the front of the cellophane bag. If you are not using a cellophane inner bag then press the cutout to the inside of the bag in both front and back. Notice that the "dress" is starting to take shape.
Step 6
Once the princess cutout is secure, pull on both drawstrings and watch the gown magically appear. This part is my personal favorite because I love how all of a sudden you go from "favor bag" to "gown"; it's such a pretty transformation and it's so easy. We love easy!
Step 7
At this point you have several options:
- Bring drawstrings back and tie. We used this method for some of the princesses including Tiana, TinkerBell and Ariel.
- Criss-cross drawstrings in front of the "gown" and bring around to the back (this is the one we did in the picture shown below) and tie. We'll show you the back in a moment.
There are several ways to tie the drawstrings in the back.
- Make a bow in the back - We think it looks so pretty that it could be in the front instead.
- Tuck leftover string inside "gown".
- Tie in the back and let the leftover strings hang down the back.
- Bring drawstring back around to the front and tie in front (towards one side) like the Mulan favor bag.
Step 8
Snip any excess cellophane that is showing from the front (careful not to snip too much).
Step 9
This is the final step...Yay! Notice the bottom corners of favor bag. The picture below shows the left bottom corner as it is naturally. The right bottom corner has been tucked in.
If you choose to tuck the corners in, then just push the corners in with your fingers an adjust until you like the way it looks. We do this step last right before placing them on the party table because since the corners are not secured with anything, they can pop back out if you're moving them around.
And then....Voila!! Your finished Disney Princess Favor Bags are done!
Leave Disney Princess Favor Bags Page and go to Disney Princess Party Favors Page
Follow the Party!
Visit Our Etsy Shop
Kids Party Works
Party Club
Party Printables, Ideas and Tips in your Inbox
Join our free Kids Party Works Party Club to get exclusive printables including our new Back-To-School Bundle, ALPHABET Letter Tracing & Coloring Printable Book, Lunch Box Planner, Coloring Binder Cover.

FREE BACK TO SCHOOL SET


Lunch Box Planner

Coloring Binder Cover

Dinosaur Shirt
Personalized Dinosaur T-Shirt

Great gift for a Dinosaur Lover! Visit our Etsy store for details on how to order yours today.

Graduation Photo Cupcake Toppers